Introduction
Due to COVID-19 restrictions our initial project had to be cancelled, because we no longer had access to the industrial robot. Therefore, we came up with the following project. The idea stemmed from the world of 3D-printing, where you create an object in 3D-modelling software and fabricate it yourself. This made us think. Is it possible to reverse this workflow, have a real-life object and turn it into a digital counterpart?
The problem
3D-printing has become easily accessible over the last few years. The price of parts and complete 3D-printers has come down dramatically. With this increased accessibility, producing your own custom parts has become much easier, this is however, if you know how to use 3D-modelling software. There are groups of people who are not comfortable with using CAD software, like children and hobbyists. If these people could make an object, with for example paper and cardboard, they could scan it in with a 3D-scanner and duplicate it with a 3D-printer.
Aside from children and hobbyists, a 3D-scanner could also work very well in tandem with CAD software, instead of bypassing it. A 3D-scanner would allow a user to scan in an object and design features around very complex geometry, geometry that does not lend itself to being measured by tape measure.
There are a few 3D-scanners on the market, but these are very expensive, simple ones are often more than €1000. Since most hobbyists, children, start ups and educational institutions often do not have money to spend frivolously, thus the need for a cheaper alternative has risen.
The solution
The solution is a 3D-scanner that is built from 3D-printed parts, together with an Intel Realsense depth camera and a microcontroller. To make a 3D-model of an object, the depth data (produced by the Realsense depth camera) of multiple views of the object, must be combined in a single model. To be able to combine the multiple views, the position and orientation of the view must be known. To accomplish this, this 3D-scanner makes use of a turntable. This turntable is controlled by an Arduino, controlling a stepper motor, because of this the location and orientation of the frames taken by the camera are known.
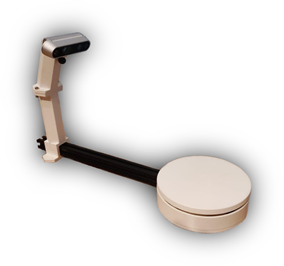
This scanner also includes an application, written in Python, in which the scanner can be controlled, and the results can be displayed. The software is packed, with the instructions for assembly, in an Instructable.
Parts
This 3D-scanner is primarily made from 3D-printed parts, so it can easily be made at home, without the use of machinery. The total costs of the scanner are around the €250, of which the biggest part is allocated (~€200) for the Intel Realsense depth camera. The scanner consists out of the following parts:
- Intel Realsense D435 (with USB-C cable)
- Arduino Uno (with USB-B cable)
- MF-6402411 Stepper motor with ULN2003 Driver
- 7 male-female jumper cables
- Skateboard/Fidget spinner ball bearing (8mm (inner diameter) x 22mm (outer diameter) x 7mm (width))
- 20x20mm extrusion profile 30cm
- M4 bolts and nuts (screw heads preferred)
- Camera mount bolt
- 3D printed PLA parts (minimal 150*150 print bed required)
- Glue
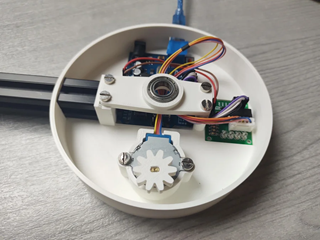
Microcontroller
The microcontroller used in this project is the Arduino Uno. This controls a stepper motor attached to the turntable. The Python application sends a trigger to the Arduino when and how far to rotate, it in turn waits for a confirmation from the Arduino. It achieves this by using a basic serial communication.
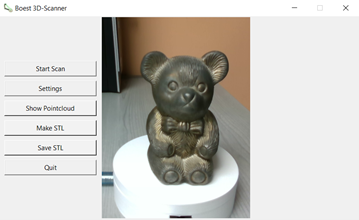
Application
The software that comes with this scanner consists of three main parts. The user interface, the communication between the different components (micro controller, camera and computer) and the generation of the 3D-model.
The user interface makes it possible to use the scanner without any programming knowledge. The main feature is of course the ability to start a new scan. In the application a variety of variables can be changed under the settings tab. These can be used to change settings ranging from frame dimensions, to variables affecting the 3D-model generation. The interface also includes the possibility to show point clouds (more on that later), show the generated model and save the model.
The communication between the camera and the microcontroller is done via Python. First the program turns on the camera and takes a frame. This frame contains both the colors and the depth data. This depth data is then appended to a cloud of points. After the frame is taken, the program sends a certain number of steps that the stepper motor has to turn to the controller, the controller then executes this and returns the same value that has been sent to it as confirmation, this way you know for certain that the turntable moved the exact amount you specified. The returned number of steps is then used to calculate the total angle that the turntable moved.
The generation of the model is done in a few steps. Once a frame has been taken, the depth data is appended to a point cloud. This is, as the name suggests, a giant set of data that contains the X Y and Z coordinates. Each time a frame is appended, the data gets corrected for the change in position and orientation. The point cloud is then used, together with the color data, to generate a mesh. The algorithm for the mesh generation compensate for a big variety of things, of which the most important are removing random extra points and of course making the mesh fully closed (solid). Finally, the mesh is then saved as a STL file, a common file for a 3D-model.
Results and Conclusion
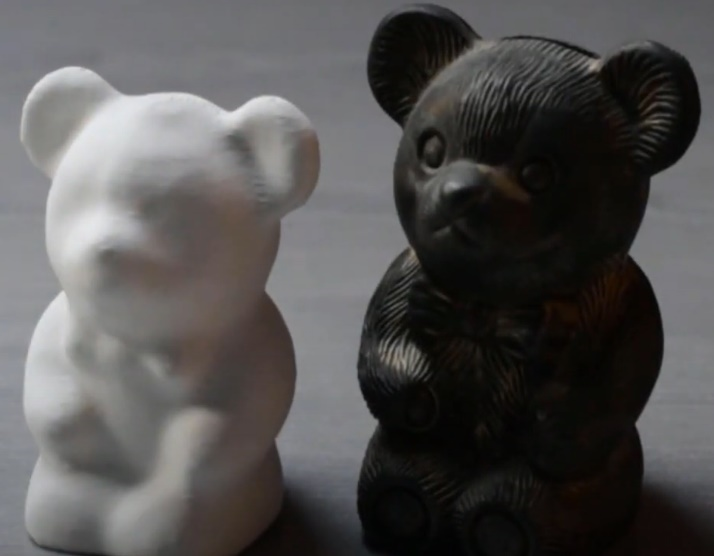
The Intel Realsense depth camera is a good platform to use when trying to scan objects. This scanner can achieve a rather good precision, the accuracy of the generated models is around 1 mm (the difference between the real-life dimensions and the generated dimensions). The 3D-scanner itself is very easy to make for a much lower cost price than the competition, this makes it attractive for hobbyists and education. There are more methods of scanning to make 3D-models than using a turntable, however. A great example of one is the “handheld” scanner, using an inertial measuring unit to determine the location of the frames. With a handheld scanner it would be possible to scan bigger objects, thus this is a direction we would like to explore in the future.