by Es-saidi Shaima
INTRODUCTION
Given the exceptional circumstances that is currently hitting the world, the minor smart manufacturing and robotics was transformed into an online project. Initially, a minor robotic oriented become a programming project initiated by students.
For 5 weeks, a solution has been developed supervised by Guus Paris, Matthijs Van Der Vegt and Thijs Brilleman. Flute automation is a project that combines arts with engineering. Indeed, I wanted to create a machine capable of playing the flute autonomously using an arduino card where you can program any piece you would like to listen to. Therefore, the tackled of this project has been made by me: Es-saïdi Shaïma a mechanical/materials engineering from France who has no experience in this field.
Project
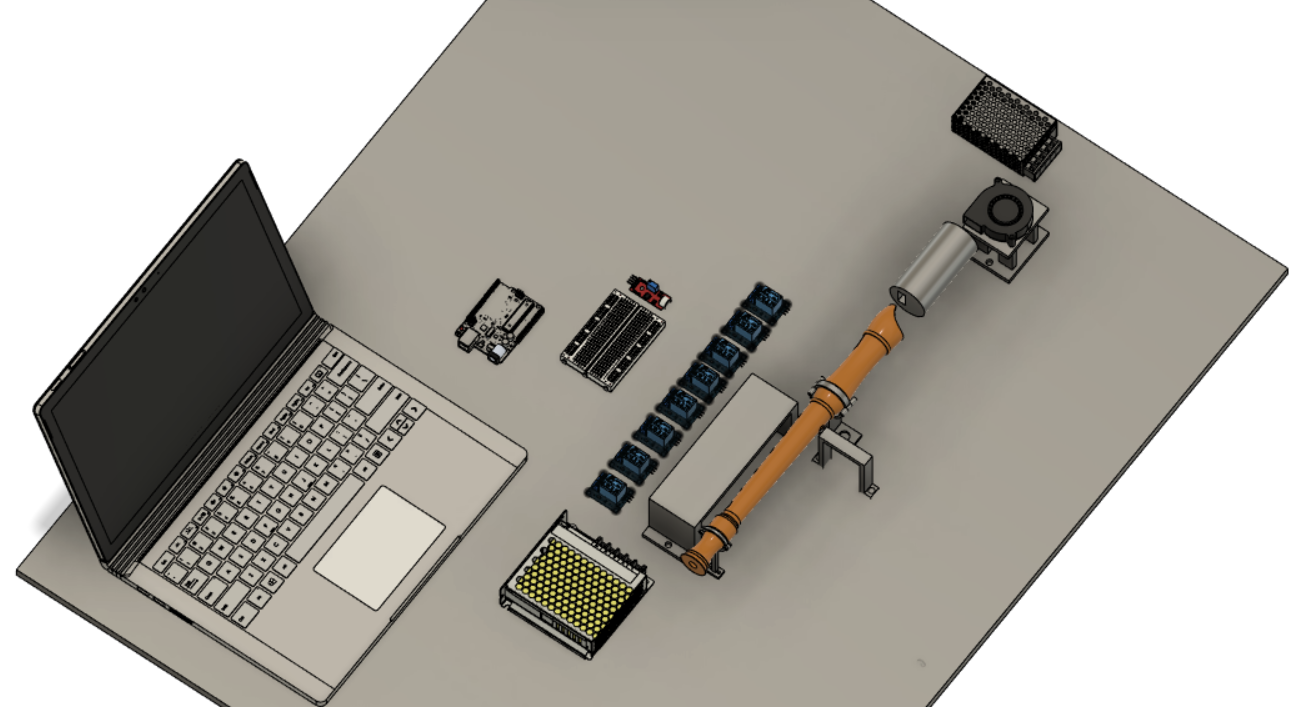
At the end of my 5 weeks project, I create a machine capable of playing flute but isn’t working as expecting. The solution I developed is one way to do it and it can be done totally differently. For this project it’s necessary to have a basic understanding of flute playing but you can still find a lot of internet resources to do it. This project is divided in 4 steps.
The musician’s breath
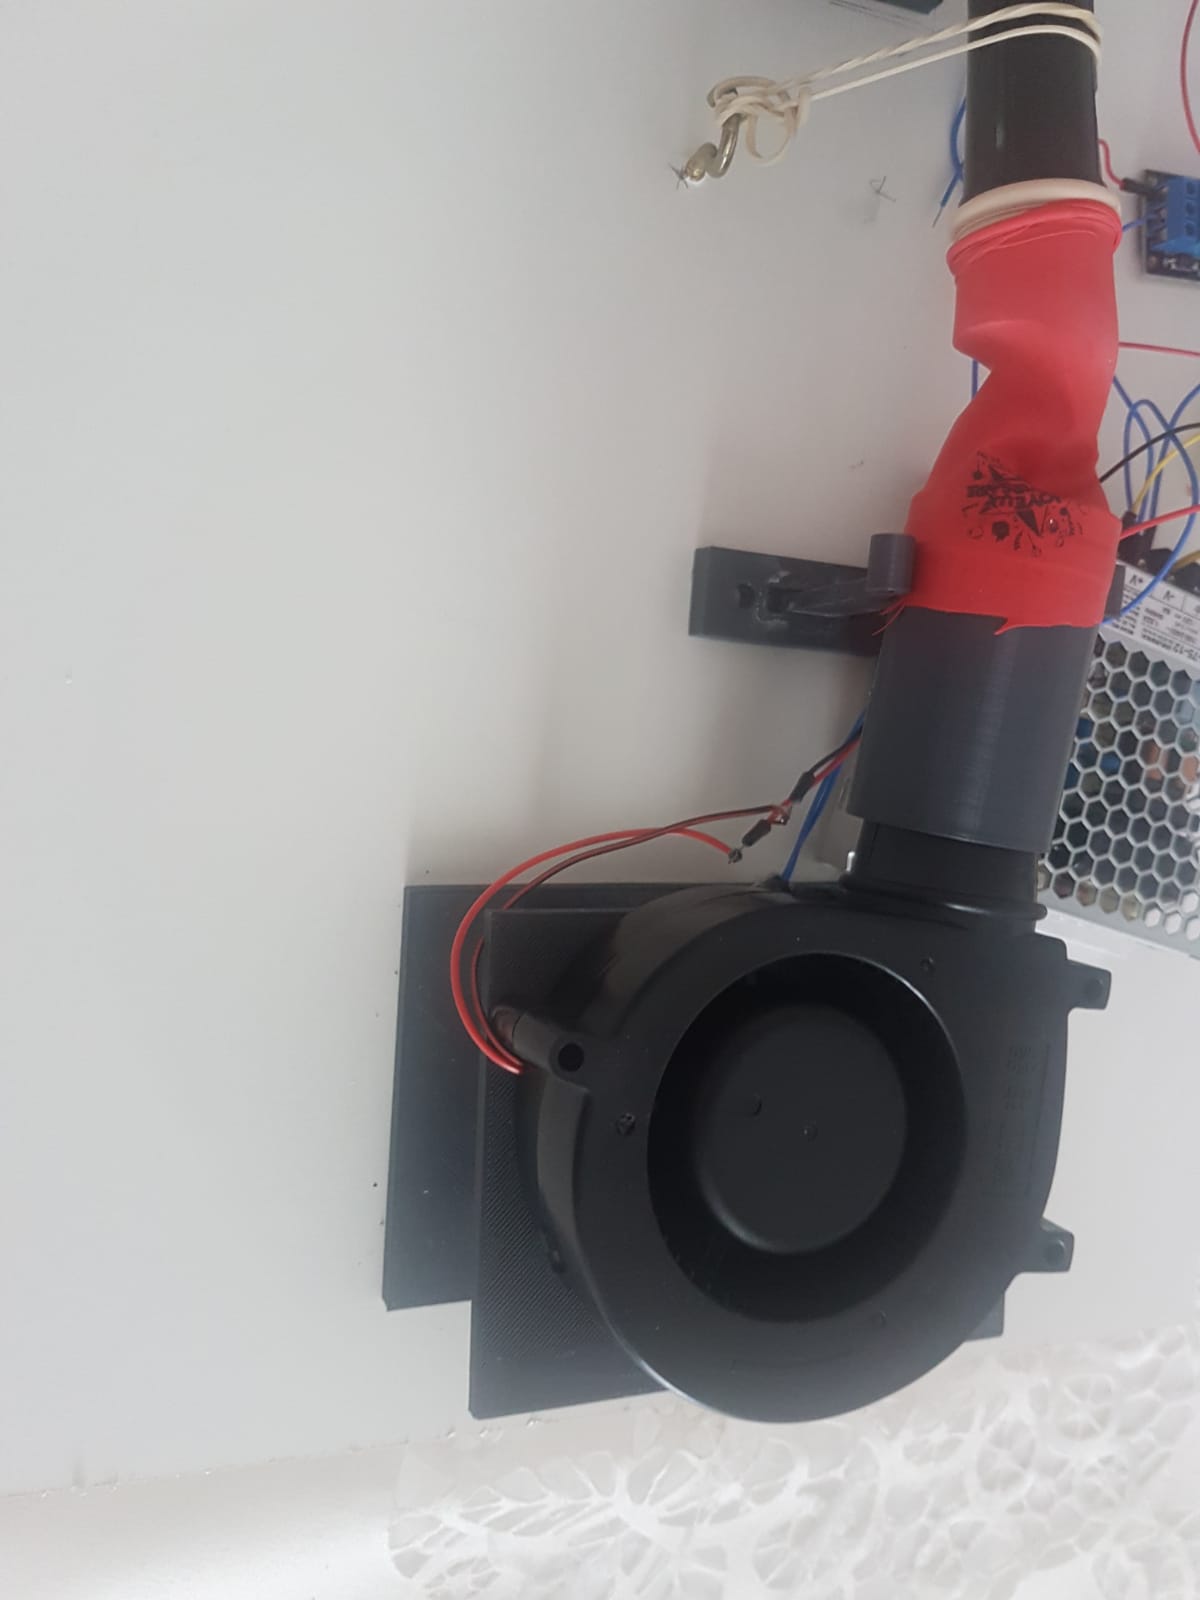
In the case of a flute, the musician blows air into the mouthpiece duct forming a blast of air which, on leaving the channel, interacts with the air column in the bore (the pipe) of the instrument, and begins to oscillate around the edge of the bevel. Part of the air is then projected into the pipe while the other part is deflected outwards (like a whistle).

In these conditions, to be able to simulate the musician’s breathing as closely as possible, I used a small radial computer fan which I directed towards the hole of the recorder’s mouthpiece through a tunnel composed of a cylinder and a balloon. In this way, the air will be able to flow gently from the fan to the flute, as in speech as the words go along, so that a note can be obtained and therefore a better sound quality can be achieve throughout the entire piece where the fan is switched on.
When you play the flute, the movement of your tongue will give a precise beginning and end to the notes and ensure the accuracy of the notes: this is called articulation. Articulation is a term that is difficult to explain and reproduce as normal and is even more difficult to achieve in our conditions. This is why it cannot be performed correctly.
The holding of the flute
Holding the flute well is first of all to balance it well.
Usually, the balance of the flute rests on the lips and thumb of the right hand. However, we cannot reproduce this configuration as it is. So, I had to design objects capable of addressing this problem in order to play the flute correctly.
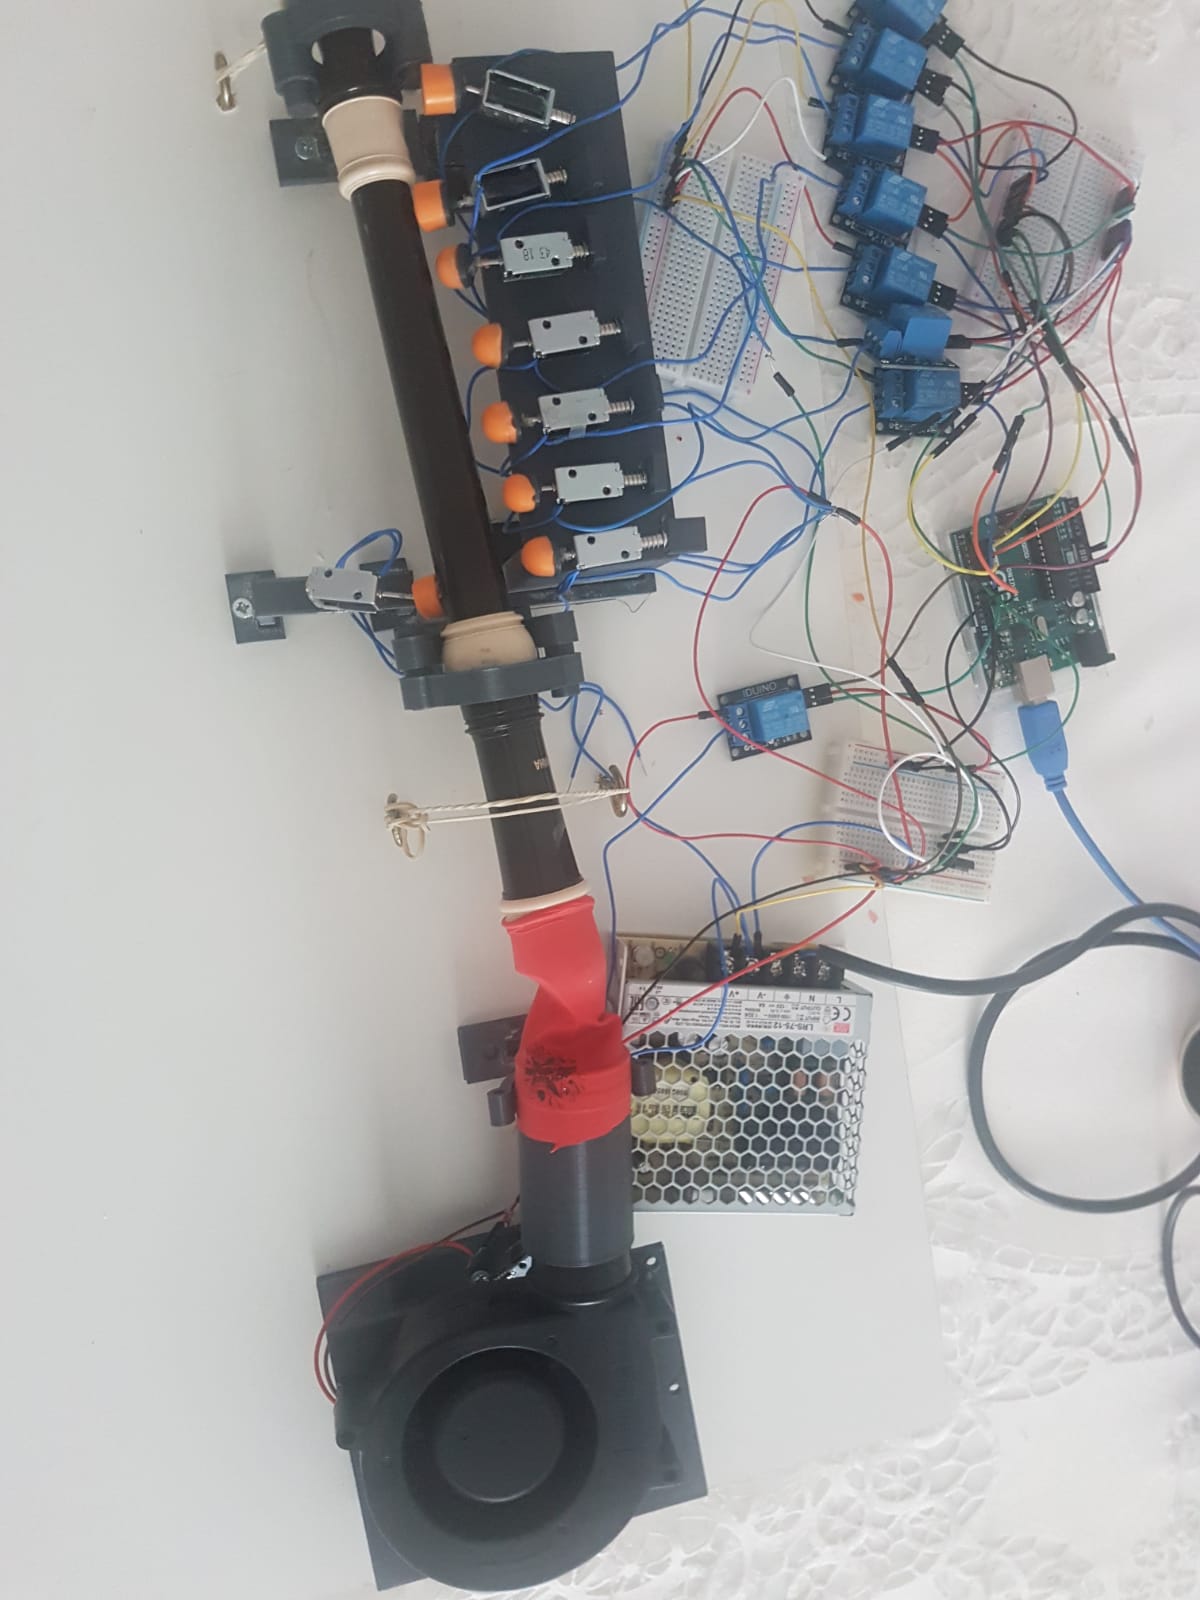
So, I created clamps to fix the position of my flute, I printed a table to place my solenoids, I placed a tube between the fan and the flute to channel the air flow and so on…
Once you have managed to imagine the products you need you can start assembling them.
The finger play
Once we have assembled our products, we can start playing our first note.
There are many ways to do this, but I will only describe the one I used in this project, which is solenoids. I used 12V solenoids to do this hole opening/closing action. The advantage of using these solenoids is to be able to push and pull and thus reproduce the movement of a finger but also it is possible to attach components on the piston of the one.
To do this, I needed a 12V power supply, relays and earplugs. In order to determine which material was the most suitable to close and open the holes, I spent a lot of time testing different materials (baking paper, aluminum foil, silicone, modelling clay) until I choose to go with: the earplug (the best solution). Once all these parts are properly tape, glue, screw to some support mechanical part is done and we can now proceed for electronic connections.
The blower and solenoids run on a 12V power supply. As explained before, voltage is stepped down to 5V to run the solenoid using a relay and is then controlled by the Arduino board.
The connections between the two are straightforward each solenoid have one pin dedicated for it and these values are reported in the code.
The song code
Now, that the hardware part is done, we can move on to the coding.
To make a proper program to play a piece, it’s very much inconvenient to set positions on each solenoids every time, so all I needed to do was specify all the notes functions and that’s about it. That way, all we have to do when writing the song is to enter the name of the note and its duration.
The code is finally finished, the last step to do is to verify all electrical connection if the solenoid should work properly and the fan is blowing air inside the flute and finally check if there is no air leakage by hearing the sound of the flute playing.
When every system is working properly, you have your automated flute.
Points of improvement
Right now, the automated flute is working not well but it’s working. A lot of things can be improved to get a better result such as such as solenoids with a longer stroke and higher thrust force, but also a smaller and therefore quieter fan.
Since the tiny leak will ruin the sound of the flute, it is important to remedy this. The other possible option is to increase the pressure on the cap to get a better seal but then it becomes difficult for the solenoid to actuate it. So, we have to cover the hole with a minimum of force for a better operation using gravity for example.
There are several possibilities that have yet to be explored, notably to succeed in simulating the articulation creating a tilting system that will obstruct the mouth of the fan and thus allow the music to come alive.
To tell the truth, I realized an equivalent system that I gave up using at the end because the fact of having air coming from the fan which was not centered only on the recorder’s mouthpiece disturbed the bevel of the flute where the air came out and therefore did not allow to obtain a correct sound because of this rather strong wind breeze preventing it from emitting a sound.
CONCLUSION
In the end, this result was not what I expected, it works in a certain way but not in the most beautiful and efficient way. Further development is needed in order to meet the goals especially another type of solenoids and fan. In spite of this more than average result, I learned many things about areas that were unknown to me and also about myself. This project was not an easy thing, but I know deep down inside that I gave it my all.